Tuesday, August 9, 2011

Grilling For A Change: New England Style Seafood Dinner


The grill and I have become very close friends this summer. The days have been so hot while the evenings cool off just a touch that although it's still warm out, it's totally pleasant... much more pleasant than being in my hot kitchen when my stove is on. I've tried grilling a little bit of everything this summer from the usual steaks and chops to all kinds of veggies and seafood. I've been totally inspired by Jamie Oliver and have basically turned my grill into an outdoor oven. Next summer maybe I'll have a full blown vegetable garden with an outdoor kitchen as I often see him working in on his show... a girl can dream!! 

This recipe popped up in my inbox a couple weeks ago and it couldn't have been more easy. It's the absolute perfect summer meal because there is very little prep work and since you cook it all in aluminum foil, clean up is even easier! Even better, there is no need to turn on your stove on a hot summer night. Just find some fish at your local market, throw in fresh corn and a couple potatoes, top with butter, dill and lemon and voila!! You have a deliciously simple and fairly nutritious meal in no time at all. It also looks really pretty when you open up the little packet with all the beautiful colors, which makes me happy!

New England Seafood Bake

2 tbsp butter, room temperature
2 tbsp finely chopped fresh dill
2 garlic cloves, minced
salt and pepper
2 large red potatoes, thinly sliced
1/2 lb skinless cod fillet, cut into about 2 by 2 inch pieces
1/2 lb uncooked large shrimp, peeled and deveined
2 ears corn, quartered or cut into thirds depending on size
1/2 lemon thinly sliced
hard rolls, optional

Heat grill to medium. In a small bowl combine butter, dill, and garlic. Season with salt and pepper and set aside.

Fold 2 14 inch squares of heavy duty aluminum foil in half to form 2 square packets. Assemble packets with potato slices layered on bottom in a single layer. Top with cod then shrimp. Place corn around outside of fish. Season with salt and pepper and top with a spoonful of butter mixture and 2 lemon slices. Fold foil over all ingredients and crimp edges of aluminum together so packets are tightly sealed. 

Place packets on grill with potato layer on bottom. Cook, rotating packets occasionally but do not flip, about 14 minutes until fish is cooked and potatoes are tender. Remove from grill and transfer to serving bowl. Serve hot with rolls. 

Recipe adapted from marthastewart.com

Monday, August 1, 2011

From Canada With Love: Poutine


One of the best things about where I grew up was that we were just steps away from the Canadian border. We had lots of fun times with our neighbors to the north... some our parents knew about... some they did not. I mean, the drinking age was 18! One of the BEST things to ever derive from Canada is poutine. Now, a classic poutine is found at a diner type place and consists of french fries, cheese curds, and gravy. Over the last few years poutine has begun to pop up at finer establishments in fancier forms with ingredients such as short ribs or even with fois gras. I'm not opposed to these new, classier dishes but I do feel that maybe they could be given a new name. Poutine is supposed to be served in a dive on a huge plate with lots of grease... it's just the way it is. 

Last weekend I was craving poutine and since it would take me over 6 hours to get the classic ingredients I realized I was going to have to make due. The fries I could easily do but I was going to have to be a little more creative with the cheese and the gravy. As long as the gravy is good and rich, it'll work so I found a recipe that included shallots, beef stock, and red wine. It sounded rich enough so I gave it a shot. The cheese was a challenge though. Poutine is traditionally made with cheese curds which are no where to be found in my hood therefore I went with original flavored baby bell cheeses. It was the closest I could think of to the texture and flavor I needed and I have to say it was a good choice. It melted a bit to quickly but the flavor was perfect! All in all I made a really great dish that I'm not sure I can confidently call poutine but I will happily call it French Fries with Gravy and Cheese.

French Fries with Gravy and Cheese 

4 russet potatoes, scrubbed and cut into about 1/2 inch thick fries
Vegetable oil, enough to fill a large pan about 1/3 full for frying
salt
3 tablespoons minced shallot
2 (3-inch) sprigs fresh thyme
1 tablespoon unsalted butter
1/2 cup dry red wine
1 tablespoon water
3/4 teaspoon cornstarch
1 cup beef or veal demi-glace
1 teaspoon coarsely cracked black pepper
1/2 teaspoon salt
1/2 tablespoon unsalted butter
6-8 babybell original flavored cheese, unwrapped and cut into about 4 squares per cheese round.


Clean potatoes and cut into about 1 inch thick fries. Place in a large bowl of cold water and let soak about 10 minutes. Rinse potatoes until water runs clear and place on paper towels to dry. Dry off potatoes as much as possible before frying. 


In a heavy bottom large pot heat vegetable oil to about 375 degrees. Once oil is hot fry potatoes in as many batches as needed so as to not overcrowd. Drain on a paper towel.

Cook shallot and thyme in butter in a heavy saucepan over medium heat stirring frequently until shallot is softened and golden, about 2 minutes. Add wine and bring to a boil until reduced by half, about 3 minutes. Discard thyme sprigs. While wine thickens, stir together water and cornstarch in a small bowl until cornstarch dissolves. Stir 1 cup beef stock into wine and bring to a boil. Whisk in cornstarch mixture and return to a boil, then boil until sauce is slightly thickened, about 3 minutes. Remove from heat and stir in pepper, salt, and butter until butter is melted.

Place fries on a large plate and top with cheese and gravy. Heat in preheated oven for about 5 minutes at 400 degrees just until cheese starts to melt. Do not completely melt cheese. It should still have it's shape, it should just be soft. Serve hot.

Gravy recipe adapted from epicurious.com

Saturday, July 23, 2011

Summertime Sweet Treats: Berry Cobbler


Summertime makes me yearn for fresh fruits and vegetables in all shapes and forms. As we all well know, I'm not much of a baker or dessert maker, but I've been wanting to make a cobbler for quite some time. A couple years ago we went to dinner at a friends house and she threw together a delicious berry cobbler for desert. She assured me that it was really easy and so, only about 3 years later, I finally got around to trying out my own cobbler. I found a recipe on epicurious.com that looked easy enough and the topping (the "baking" part) involved just a few simple steps thus I figured there was no way in H-E-double-hockey-sticks that I could mess it up! And lucky for us... I did not! It was incredibly easy and incredibly delicious.

Mixed Berry Cobbler

1 cup plus 1 tsp packed brown sugar
 2 1/2 tbsp cornstarch
2 3/4 lb mixed berries (I used blueberries, raspberries, and blackberries)
2 cups flour
2 tsp baking powder
1/2 tsp salt
1 1/2 sticks cold unsalted butter, cut into pieces
3/4 cup whole milk
1 tsp granulated sugar

Preheat oven to 425 degrees. Stir together 1 cup brown sugar and cornstarch in a large bowl. Add berries and toss to coat. Transfer to a shallow baking dish and bake until hot, about 12 minutes.

Meanwhile, whisk together flour, baking powder, and salt in a medium bowl. Add butter and blend with your fingertips or a pastry blender until mixture resembles coarse meal with some roughly pea size butter lumps. Add milk and stir just until dough comes together.

Remove baking dish from oven and drop large tablespoons of dough onto hot berry mixture. Stir together remaining teaspoon brown sugar and granulated sugar. Sprinkle sugars over dough and bake cobbler until topping is golden, 25 to 30 minutes. Remove from oven and cool about 20 minutes. Serve warm.

Sunday, July 17, 2011

Concert in the Park... at the Farmhouse

Last weekend the hubs and I had the pleasure of hosting a little food and wine tasting party at our house. We weren't really sure what to expect as we had absolutely no part in the planning and really just provided the venue but I have to say I was very pleasantly surprised with the turnout. We ended up having a little over 70 guests with lots of different folks from the Princeton area. We got to spend time with family members and got to know some new friends. There was awesome live bluegrass, delicious food prepared with all local ingredients by some amazing local chefs, and lots of wine flowing all night! The event was a huge success and I'm so happy that we got to host it! I was not the chef at this event and thus I don't have any recipes to share but I do have lots of photos. I can't wait for the next dinner on the farm and hope that this will not be the last concert in the park at the farmhouse!

The set up...


 The party...

 The Bluegrass...

 The food...


Grilled Corn, Panzanella Salad, Spicy Slaw, Kale Salad, Truffled Potato Salad


 BBQ Pulled Pork

Brisket

 Fried Bay Shrimp

 Blackened Catfish

The happy hosts... (Don't mind the hubs. He always looks this excited when he's really happy!)


Wednesday, July 6, 2011

Inspired by a Top Chef: Grilled Octopus salad with Lemon-Pistachio Vinaigrette


A couple weekends ago the hubs and I had the chance to spend a very short 2 days in Chicago. The hubs was headed there for business and his company was kind enough to get us a room starting Friday night so we could spend the weekend in the windy city. Maybe it's because we haven't had a little getaway in quite some time or maybe it's just because Chicago is a fabulous city but either way, we had an amazing time! It reminded me of how much I miss city life. Don't get me wrong, I much prefer to live in the country but in our last home in Cali we had the best of both worlds. We were only 15 minutes outside of San Fran but lived in the quiet suburban town of Mill Valley in a house in the woods on one of the many beautiful hills of Mt. Tamalpais... deemed by some of my friends as a tree house. Since I worked in the city I still experienced city life, more importantly city food, daily but was able to escape as much as we wanted or as little as we wanted every weekend. We still have the luxury of being near a city here in Jersey but since the commute is not quite as easy and it takes a lot longer we don't venture into New York all that often. It's been a couple months since I was last in NYC so our quick trip to Chicago was a much needed dose of city life.

We had very little time, arriving late Friday night and leaving early afternoon on Sunday so on Saturday we tramped all over Chicago. We checked out Lake Michigan, ventured to a street fair on Randolph Street, enjoyed a little baseball action just outside of Wrigley field, had a very creative dinner, and finally ended the night at a speak easy called the Violet Lounge. Chicago is such a cool city. It is really beautiful with the Chicago river running through it and all of the old architecture. It also has a pretty great food scene and as you can imagine, one of our goals for the weekend was to seek out a really great dinner. Initially we had planned to go to an old school steakhouse but after a little more thought I was craving something a little different. After some research I found that Top Chef Season 2 winner, Stephanie Izard, owned a restaurant in Chicago called Girl and the Goat. The menu looked really interesting, really creative, and really good. We decided to go for it even though we didn't have a reservation (apparently it takes months to get a table there but we went early and only waited about 20 minutes) and it was the best decision of the weekend! We had quite a few different dishes: sauteed green beans with a fish sauce vinaigrette, hiramasa crudo with crisp pork belly, crisp calamari with rabbit ravioli, wood oven roasted pig face with sunny side egg, a goat belly dish, and finally the highlight of the meal which was actually a mistake- grilled baby octopus with a pistachio lemon vinaigrette. Lucky for us the kitchen made this dish accidentally for another table and apparently we looked like we would be happy to take it... which we were.

I've had octopus once before in Greece but it was served cold. It was delicious but very different from this dish. We LOVED this dish! The octopus was grilled and had the perfect smoky flavor and every component in the dish complimented each other so perfectly. It included Fava beans, guanciale (a thin, non smoked or cured Italian bacon), red cabbage, wax beans, radishes and the vinaigrette. The flavor was perfect, the texture was perfect, and all in all this may have been the most memorable dish I've ever eaten. Thus, I had to try to re-create it. I've never made octopus before so it was a total shot in the dark. I also couldn't find all of the exact ingredients so my dish is more of an adaptation than a recreation of the dish we had at Girl and the Goat. Luckily for the hubs and I though, our dish wasn't half bad. I will definitely continue to experiment with this dish and try to perfect it and will for sure be serving this at our next dinner party!

Grilled Octopus Salad with Lemon-Pistachio Vinaigrette

Salad:
1/2 lb octopus
2 slices thin cut bacon
2 radishes, sliced thin
handful of yellow wax beans
1/4 cup fava beans
1/4 cup red cabbage
little less than a 1/4 cup pistachios

In a saucepan add octopus and enough water to cover octopus but about 2 inches. Bring to a boil and simmer about an hour. Remove from boiling water and once cool enough to handle cut into large bite size pieces.

Cook bacon in a fry pan until lightly crisp. Boil wax beans in water about 5-7 minutes until just starting to become tender.

Heat grill. In a bowl toss all salad ingredients in dressing to lightly coat. Transfer to a mesh fry pan (one made for grilling). Cook on grill until salad ingredients are lightly charred, about 10 minutes. Remove from grill and toss with a bit more dressing to lightly coat salad and serve.

Vinaigrette:
1/3 cup fresh lemon juice
1 shallot, chopped
2 tbsp fresh tarragon, chopped
1 tbsp red wine vinegar
1 tsp sugar
2 tsp dijon mustard
3/4 tsp salt
1/2 tsp pepper
3/4 cup olive oil
1/4 cup pistachios

In a blender mix lemon juice, shallot, tarragon, red wine vinegar, sugar, dijon mustard, salt, and pepper until smooth. With blender running, add olive oil in a steady stream until well incorporated. Turn off blender, add pistachios and pulse until finely chopped.

Just a couple tips:

2. You will not use much of the dressing for this recipe, only a couple of tablespoons. It is delicious though and can be stored in your fridge for about a week. It'd be great on a salad but tonight I'm using it as a marinade for some chicken I plan to grill which I'm pretty sure is gonna be goooood!

p.s. the photo above is not actually of my dish, it's of the dish that inspired me. my dish looked a little different, but sorta the same... you get the idea!

Wednesday, June 22, 2011

Summer Sides: Carmelized Tomato Salad with Smoked Gouda


One of my most favorite things about summer is delicious tomatoes. I am absolutely head over heels for fresh tomatoes that are best at the peak of summer. They are delicious in a tomato sandwich which I'm pretty sure my mom enjoys at least once a day all summer long. And by tomato sandwich I mean just that... soft fresh bread (toasted if you wish), tomatoes, mayo (or miracle whip as is the case in our family), and to top it off a sprinkling of salt, pepper, and a little dill. I also love roasted tomatoes as a super simple side dish... Roma tomatoes, olive oil, fresh garlic, salt, pepper and roast in the oven for about an hour in low heat. To make a long story short, I love tomatoes because they are absolutely delicious when you let them shine and when prepared in super simple fashion.

Now that I've professed my love to tomatoes and given you a couple super simple recipes to boot, let's get to the matter at hand... a recipe with both tomatoes and cheese... my two loves (other than the hubs and the hounds of course!). Summertime makes me want to cook lots of fresh vegetables and this recipe is one that totally enhances the freshness. It screams summer to me. It was great as a side dish. I served it with sea bass topped with a super yummy cilantro, lime, jalapeno sauce (recipe will come... promise). I think this could also be great at a summer BBQ as an app. It's super easy. Toss it all together, throw it in a bowl, toast up some bread and put it on a table for your guests to pick at until it's completely demolished.  Either way it's the perfect summer side dish.


Caramelized Tomato Salad with Smoked Gouda

2 cups olive oil
1 3/4 lb cherry tomatoes, divided
1/3 cup sugar
2 fresh thyme sprigs
1/3 cup sherry vinegar
8 oz smoked Gouda
8 green onions thinly sliced
baguette, cut into about 1 inch thick slices and toasted

Preheat oven to 275 degrees. Place 1 1/4 tomatoes in a 8x8x2 inch metal baking dish and toss with oil, sugar, and thyme. Roast in preheated oven until tomatoes are tender, about 2 hours. Cool caramelized tomatoes in oil.

Using a slotted spoon transfer tomatoes to a large bowl. Transfer 1/2 to 3/4 cup oil from baking dish to a separate medium bowl, reserving rest of oil. Add vinegar to oil in bowl with oil. Whisk to blend oil and vinegar and season with salt and pepper.

Add reserved fresh tomatoes, cheese and dressing to bowl with caramelized tomatoes. Lightly toss just enough to combine all ingredients. Top with green onions and serve with toasted baguette slices.

Recipe adapted from epicurious 

Monday, June 13, 2011

Adventures in Baking: Zucchini Whoopee Pies with Cream Cheese Filling


So, I had this grand idea a couple months back that I was going to start a whoopee pie business. I mean, these days, my grand ideas need to get in line cuz I keep having them, but I ain't doin them! Funny thing about this particular idea is that I'm a terrible baker. My first attempt was just short of awful... ok, it was awful. The pies had these weird chewy chunks in them and the filling was way too runny. After this attempt, I was pretty convinced that whoopee pies would not make me famous. Just as I was about to give up on my latest and greatest plan, I stumbled upon this recipe for zucchini cookie sandwiches... aka zucchini whoopee pies! Clearly my business was not going to happen over night and I was not going to become a top notch baker without a little, ok, a lot more practice so I figured why the heck not try my hand at these little guys and with just a couple minor hiccups in the process I ended up with an uber delicious end result and my excitement and ambition for this new venture is back! I still have a lot more practicing to do but at least now I know it's possible which makes me very happy.


The texture of the zucchini cookies is perfect for whoopee pies and the cream cheese filling worked out way better than the marshmallow fluff filling I attempted last time. It is the perfect consistency to hold the yummy cookies in place. I think the only change I will make at this point is to make the cookies smaller next time. Oh, and the recipe I used called for walnuts which I decided not to include because I'm not a huge fan of nuts but I have to say, I think I will include them next time. I think they'll add a little needed crunch.


So, without further adieu... a super yummy recipe for baked goods that even I could make! Enjoy!


Zucchini Whoopee Pies


1 cup all purpose flour
1/4 tsp ground cinnamon
1/2 tsp baking powder
1/2 tsp baking soda
coarse salt
1 1/2 sticks unsalted butter, room temperature
1/2 cup granulated sugar
1/2 cup packed light brown sugar
1 large egg
1/2 tsp pure vanilla extract
1 cup finely grated zucchini
1 cup rolled oats
1/2 cup chopped walnuts, toasted
8 ounces cream cheese, room temperature
1 cup confectioner's sugar, sifted


Sift flour, cinnamon, baking powder, baking soda, and 1/4 tsp salt into a bowl. Set aside. 


In a large mixing bowl, beat 1 stick of butter, brown sugar, and white sugar until fluffy and pale in color. Beat in egg and vanilla. Beat in flour mixture. Mix in zucchini, oats, and walnuts. Refrigerate until firm, about 1 hour. 


Preheat oven to 350 degrees. On a parchment lined baking sheet, drop heaping tablespoons of zucchini batter about 2 inches apart. Bake until edges are golden, about 17 minutes. Remove from oven and cool on wire racks.


Beat together remaining 1/2 stick of butter, cream cheese, and confectioner's sugar until smooth. When cookies are cool enough to handle, drop a heaping tablespoon full of filling onto bottom side of one cookie and sandwich with another cookie. Repeat with remaining filling and cookies.


Recipe adapted from Martha Stewart

Wednesday, May 18, 2011

Spring at the Farmhouse: Savory Wild Mushroom Bread Pudding


Finally... some recipes from my super yummy first ever holiday dinner party. While planning my Easter dinner menu I wanted to make some Spring classics while also including some dishes that represented my cooking style. One of the best dishes I've made and posted here was this past fall with my savory butternut squash bread pudding. It was a super yummy dish, I got great feedback from those who tried making it, and I was even linked to on a very cool blog that gives lots of tutorials on all kinds of different things called Tipnut.com. So, I decided that another, more Springy, bread pudding would make for a perfect side dish to pair with the classic Roasted Spring Leg of Lamb that I planned to make for my main dish.

One of the things I find so exciting about food these days are all the fun twists and turns chefs make. Obviously, bread pudding was a classic sweet dish generally served for dessert. Nowadays though, do a little google search for bread pudding and all kinds of sweet and savory recipes pop up. I found this dish on epicurious.com and with my love of mushrooms (and my moms) I couldn't help but add this to our Easter menu. It was a yummy alternative to plain old dinner rolls and it's a hearty dish so it would make for a really great dinner with a little mixed greens on the side.... whether it be a leftover from a big holiday dinner or made for a low key romantical dinner at home with you and the one you love.

Wild Mushroom Bread Pudding

4 cups fresh bread crumbs (preferably challah or brioche)
1 1/2 lb fresh mixed wild mushrooms such as criminis, oyster, chantrelles
1/2 cup finely chopped shallots
2 tbsp unsalted butter
1/2 cup finely chopped flat leaf parsley
2 large garlic cloves, finely chopped
2 cups half and half
4 large eggs
1/2 cup grated parm

Preheat oven to 350 degrees with rach in middle of oven. Bake bread cubes in a single layer in a large shallow baking pan until lightly golden brown, about 10 minutes.

Tear or cut mushrooms into 1/4 inch thick pieces.

Cook shallot in butter over medium heat in a heavy skillet, such as a cast iron skillet. Stir occasionally until shallots begin to soften, about 3 minutes. Add mushrooms, 1/2 tsp salt, 1/4 tsp pepper, and cook until liquid that mushrooms release has evaporated, about 15 minutes. Add parsley and garlic and cook, stirring, 2 minutes. Remove from heat.

Whisk together half and half, eggs, cheese, 1/2 tsp salt, 1/4 tsp pepper in a large bowl. Add mushrooms and bread cubes and stir to combine until bread is well coated. Let stand 10 minutes for bread to absorb egg mixture.

Butter bottom and sides of a baking dish or casserole. Spoon mixture into baking dish and bake until firm to the touch, 30 to 35 minutes. Serve hot.

A couple tips:
1. The bread is important! I used challah because that is what my local Whole Foods Market had on hand. Most importantly, you want a soft bread and not a crusty one such as a french bread or baguette.
2. The recipe says to cut mushrooms into 1/4" thick pieces but I really wanted to taste the mushrooms so I made mine a little larger, about 1/2".
3. There are lots of ways you can change up this recipe. Try different bread like whole wheat or a different type of cheese, fontina maybe? Also read reviews that made it a little healthier with substituting olive oil for some of the butter and lowfat milk for some of the half and half. Lots of things to try for the next many times I plan to make this dish!

Recipe adapted from epicurious

Sunday, May 8, 2011

A Little Lovin For My Mama!

Don't you just hate it when life gets so busy that you have no time to stop and take a moment to appreciate all that you have? You know, a moment to stop and smell the flowers!? Well, I think that's basically what has happened to me this past month but luckily today I finally had my moment! While spending a little time at home, working in my flower gardens while the hubs smoked brisket in his new smoker I had some time to literally and figuratively stop and smell the flowers.

The last few weeks have been really great but really busy at the same time. The most important lady in my life, my mama, was here visiting for a little over two weeks. Now that she is gone, I'd give anything to have her back! Our time went way too fast and there is so much that we didn't get to do. There is just something truly special about every moment that I get to spend with my mama. We've always had a special relationship and I can honestly say, my mom has been my best friend my entire life. I've always thought of her that way and I know I always will.

One of the things I've enjoyed most with her the past few times she's visited is spending time in the kitchen together. The hubs and I hosted our first holiday dinner party this past Easter and frankly, I couldn't have done it without my mama. She was my sous chef the entire day. I barked commands to her and she gladly obliged, just as any well trained sous chef would. She put up with me while I was totally stressing out in the morning and not necessarily acting like the sweet lil' girl she raised. We managed to pull off the dinner without a hitch and I think everyone who attended will agree that it was a huge success.

Lucky for you I have a couple of yummy recipes to post.... a savory wild mushroom bread pudding, roasted leg of lamb, and maybe I'll even get the hubs to share his super yummy grilled calamari stuffed with feta cheese recipe which I think was totally devoured within a matter of minutes from us sitting down to eat. Ya, have I mentioned that the hubs is a ridiculously good cook! But for now I figured I'd just share some pics of the day and let this be a little lovin for my mama since today is meant for mamas! So mama, thank you so much for all of your help on Easter day but more importantly, thank you for being my best friend and the most amazing woman I've ever known! I love you!


Thursday, April 14, 2011

Spring at the Farmhouse: Asparagus, Mushroom, and Onion Tart


One of the best things by far about being back in the Northeast are the changing seasons. Seeing all the new life bloom outside my windows this Spring is making me so happy to be back home. I have this gorgeous flowering tree right outside my living room window and each day it seems to get more and more beautiful. Witherspoon street in downtown Princeton, NJ (about 6 miles from where I live) is covered in flowering trees and super cute daffodils are springing up everywhere! And then there is the food. One of my favorite vegetables is asparagus which is a shining star of the spring season. I was looking for an easy recipe and something a little different. I've been waiting to make an asparagus tart since I watched Jamie Oliver make one a couple months ago on his show Jamie at Home and now that asparagus is springing up everywhere I finally have the chance to give it a shot.

I found this recipe on epicurious but I added sauteed onions. I was hoping the onions would add a hint of sweetness but I didn't cook them long enough. Next time I am going to try cooking the onions low and slow in a pan on top of the stove. This will give them that great slow roasted sweetness which I think will be the perfect compliment to the slightly bitter asparagus. I also cut back on the amount of lemon zest and added a bit more Gruyere because well, we all know how obsessed I am with cheese! I served this as a side to a slow roasted halibut with a cheesy herby bread crumb topping which don't you worry, I'll post soon. The tart would also make really great appetizers.... maybe for Easter dinner??? Just cut the puff pastry into smaller squares, for example cut one sheet of puff pastry into 8 squares instead of 4.

Asparagus, Mushroom, and Onion Tart

1 pkg. puff pastry (2 sheets), thawed
1/4 cup unsalted butter
12 oz shitake mushrooms, stemmed and cut into 1/4 inch wide strips
1 tsp salt
1/2 tsp freshly ground black pepper
1 lb slender asparagus spears, cut on diagonal into 1 inch pieces
1 1/2 tsp fresh thyme
1 1/2 tsp finely grated lemon zest
1/2 cup creme fraiche (can be found with specialty cheeses at your grocery store)
1/2 cup grated gruyere cheese
2-4 tbsp melted butter

Roll out each pastry sheet into about 10 inch squares. Cut each into 4 squares (or 8 if making smaller for appetizers). Arrange squares on rimmed baking sheets.

Melt butter in a large heavy skillet over medium heat. Add mushrooms, sprinkle with 1/4 tsp salt and 1/4 tsp pepper. Saute until tender and lightly browned, about 4 minutes. Transfer to a large bowl and cool about 15 minutes. Add asparagus, thyme, lemon zest, 3/4 tsp salt and 1/4 tsp pepper to mushrooms. Mix in creme fraiche and cheese.

Preheat oven to 400 degrees. Mound filling atop pastry squares leaving a 1/2 inch border around center of each tart. Brush border with melted butter. Bake tarts 20-22 minutes in preheated oven until tarts are puffed and golden brown.

Recipe adapted from epicurious

Monday, April 11, 2011

A Birthday Celebration with Julia Child's Boeuf Bourguignon

Happy birthday to you, happy birthday to you, happy birthday dear Pretty in Pork, happy birthday to you! It's Pretty in Pork's first birthday today! I'm very excited that my little piglet has made it through it's first year already! It's been quite the year for me and I'm so happy to have had this space to document it all. I feel like I've become a better cook and am growing closer to the possibility of fulfilling my foodie dreams... whether that be for Pretty in Pork to manifest into a cookbook one day, or to become a whoopee pie business, or maybe an underground restaurant. We shall see!


To celebrate I wanted to make something by one lady who I find very inspiring. I wasn't all that interested in Ms. Julia Child until I watched the movie Julie and Julia while spending one of the most fun weekends of my life in Mendocino with three of my favorites. I absolutely love all things french and often tell my husband that if I could live anywhere in the world, it would be in a rustic farmhouse in the south of France. I love that Julia was so inspired by food when living in Paris and that she became a famous chef with very little formal training. I don't think I'll ever get to live in France, or at least not any time soon, but I can channel all things french through Julia's recipes. I decided I should start off with her most famous recipe, Boeuf Bourguignon. I actually thought that it was more of a beef stew but came to find out that it really isn't. It's basically beef braised in wine and then served with a  delicious sauce. It was very fancy and very yummy. And, I got to spend quite a few hours in the kitchen making it so I found it super fun! I have to warn you, it's a lot of steps and a good amount of work but there is really nothing hard about it. Just follow Julia's steps and it will be great! It also looks and sounds very impressive so it would be a fabulous dish to serve at a fancy dinner party.

Julia Child's Boeuf Bourguignon

4 slices thick bacon
1 tbsp olive oil
3 lbs lean stew beef cut into 2-inch cubes
1 carrot, sliced
1 onion, sliced
1 tsp salt
1/4 tsp pepper
2 tbsp flour
3 cups red wine such as chianti or pinot noir
2 to 3 cups beef stock
1 tbsp tomato paste
2 cloves garlic, mashed
1/2 tsp thyme
1 bay leaf
18 to 24 brown braised onions, recipe to follow
1lb sauteed mushrooms, recipe to follow

Preheat oven to 450 degrees. In a dutch oven or heavy bottomed pot, saute bacon in oil over medium heat for 2 to 3 minutes until lightly browned. Remove bacon with a slotted spoon and set aside. Dry beef in paper towels and saute in hot oil and bacon fat until nicely browned on all sides, about 5-7 minutes. Set beef aside. Saute veggies in oil and bacon fat until starting to lightly brown. Discard the sauteing fat and oil.

Add bacon and beef to veggies. Toss with salt and pepper. Add flour and stir to lightly coat beef. Move dish to preheated oven, uncovered, and cook for 4 minutes. Remove from oven, stir, and put back in oven for another 4 minutes. This will give beef a nice light brown crust. Remove from oven and turn down to 325 degrees.

Place dish over medium heat. Stir in wine and enough beef stock to barely cover beef. Add tomato paste. Place garlic and herbs in a little bundle in a cheese cloth (this makes them easier to remove later and saves a step when making the sauce) and add to dish. Bring to a simmer on top of the stove then cover and set in lower third of preheated oven. Let simmer very slowly in oven for 2 1/2 to 3 hours. The meat is done when it is fork tender.

When meat is done, pour the dish into a colander placed over a saucepan. Wash out the casserole and return beef and bacon to it. Add the brown braised onions and mushrooms to the pot.

Skim fat off the sauce and simmer for a minute or two. You should have about 2 cups of sauce thick enough to coat the back of a spoon lightly. If too thin, boil it down rapidly until it thickens. If too thick, add a little beef stock. Pour sauce over the meat and vegetables. Cover and simmer for 2 to 3 minutes, basting the meat several times. Serve with boiled potatoes.

Brown braised onions:
18-24 small pearl onions, peeled
1 1/2 tbsp butter
1 1/2 tbsp oil
1/2 cup beef stock
salt and pepper to taste
4 parsley sprigs, 1 small bay leaf, 1/4 tsp thyme; tied in cheesecloth

Heat oil and butter in a skillet. Add onions and saute over medium heat for about 10 minutes. Stir frequently to try to brown as evenly as possible.

Pour stock, salt and pepper, and herbs in cheesecloth in a small saucepan. Add sauteed onions. Cover and simmer to braise the onions 40-50 minutes until all the liquid has evaporated.

Sauteed Mushrooms:
2 tbsp butter
1 tbsp oil
1 lb mushrooms, quartered

Heat butter and oil in a skillet over medium high heat. Once butter has stopped foaming, add mushrooms and cook 4-5 minutes until mushrooms are lightly browned, stirring frequently.

Recipes adapted from Julia Child's Mastering the Art of French Cooking with Louisette Bertholle and Simone Beck

Thursday, March 31, 2011

Simple Elegance: Quick Coq Au Vin


I used to make a quick version of Coq Au Vin, or so I thought, as part of our regular weeknight meal rotation. I had a recipe that was all made in one pot and could be done in less than an hour. The hubs really liked it and I liked that it was easy. I hadn't made the dish in quite some time and I thought of it the other day when trying to come up with something delicious but a little more special to make for the hubs on my day off. I figured since I had the day off I could find a different recipe that maybe would be more work but would be more like the classic Coq Au Vin, which takes a whole lot longer to prepare. When searching for a new recipe, I learned my old dish was really nothing like what Coq Au Vin is supposed to be. It was a good dish, but now I don't even think it can be called Coq Au Vin. Here I was searching for a chicken dish with tomatoes and wine but apparently I was way off. Obvi, Coq Au Vin is the super fancy french way of saying chicken cooked in wine, and to my surprise, there are no tomatoes involved. There is however a whole lot of wine, yummy mushrooms, bacon, garlic, shallots, chicken, etcetera, etcetera, etcetera. What I realized in the end that I was not wrong that I love Coq Au Vin, I was just totally wrong in what it actually was... and boy am I glad to be wrong!

The absolute best thing about this dish is that it sounds totally impressive but I'll let you in on a little secret- it's totally easy! Totally simple elegance!

Quick Coq Au Vin

3 tbsp olive oil
3 slices thick cut bacon, roughly chopped
4 chicken thighs
1 handful flour seasoned with salt and pepper
8 oz crimini mushrooms, halved
8 shallots, cut into slices
2 garlic cloves, pressed
1 bottle red wine, less one glass (for the cook!)
1 cup chicken broth
1 bay leaf
2 sprigs fresh thyme

Heat oil in a large heavy bottomed pot or dutch oven over medium high heat. Add bacon and cook until crisp. Set bacon aside.

Shake chicken with the seasoned flour in a plastic bag until coated. Shake off any excess flour and brown chicken in pot, 4-5 minutes per side. Set chicken aside with bacon.

Saute mushrooms, garlic and shallots in pot until they just begin to brown, about 5 minutes. Pour half of wine into pan and cook over high heat for about 8 minutes. Add broth and the rest of the wine. Bring to a boil and add the chicken, bacon and herbs to pot. Return to a boil then cover and simmer 45 minutes. Remove bay leaf, thyme and serve.

Recipe adapted from 2 epicurious recipes found here and here.

Wednesday, March 23, 2011

Deliciously Simple Suppers: Peppered Beef Stroganoff


If your anything like me, then I know what you're thinking right now.... beef stroganoff? Beef stroganoff is one of those dishes that I'm well aware of but has never sounded particularly yummy to me. Actually, it kind of sounded the opposite- steak with some weird creamy sauce served over egg noodles?? It just seems so un-natural. Then, a couple weeks ago, while out running errands with the hubs I was searching through my ever trusty epicurious iPhone app and stumbled upon this dish. The photo looked incredibly appetizing and the recipe sounded a lot better than what I had originally perceived to be beef stroganoff. I read the recipe to the hubs and he seemed to think it sounded just fine so I figured now was as good a time as any to attempt a well known classic and hope that it didn't suck. You also should be aware by now of my new found love/addiction to mushrooms and this dish screams mushrooms so I had to try it! So, I give to you a pretty darn delicious recipe that will hopefully change your mind like it did mine on a deliciously simple classic dish.

Peppered Beef Stroganoff

1 tbsp coarsely ground peppercorn melange (mix of green, pink, white and black peppercorns)
2 8 oz beef tenderloin steaks or strip steaks
3 tbsp olive oil, divided
8 oz crimini mushrooms, halved
1 1/4 cups beef broth
1 tbsp cognac or brandy
1/2 cup whipping cream
1 tbsp Dijon mustard
1 8.8 oz pkg wide egg noodles
1/4 cup chopped fresh Italian parsley

Sprinkle pepper and salt all over both sides of steaks and press to adhere. Heat 1 tablespoon olive oil in large nonstick skillet over medium high heat. Add steaks and cook to desired doneness, about 4 minutes per side for medium rare. Transfer beef to plate and tent with foil to keep warm.

Add 1 tbsp oil and mushrooms to same skillet. Saute until browned, about 4 minutes. Add broth and cognac and bring to a boil. Add cream, boil until slightly thickened, about 3 minutes. Whisk in mustard.

Meanwhile cook noodles in pot of boiling salted water until just tender. Drain and return to pot. Toss with parsley and 1 tbsp oil. Season with salt and pepper.

To serve, divide noodles among 2 plates. Slice steaks into 1 inch thick slices and place atop noodles. Spoon mushroom mixture over steaks.

Recipe adapted from epicurious

Sunday, March 20, 2011

Sunday Supper For the Hubs: Chicken Parmesan with Homemade Chunky Tomato Sauce


I'm doing my best to strive in my wifely duties lately while working the crazy hours that I do. Most nights, I'm not home to make dinner and I have to admit, that is one thing I really miss about having a 9-5. There was nothing I enjoyed more than coming home after a long day at work than pouring myself a glass of wine and spending a little quality time in my kitchen. I still get to enjoy nights like this a couple times a week but I've found that now that I am not able to cook as much during the week, I need to find meals that can last a couple days for the hubs to enjoy on those nights when I'm not around. Not that he isn't self-sufficient. He absolutely is. I think he just got very pampered the last few years when it comes to his dinners and he misses that. So, while he is paying the bills, I'll do my best to oblige and ensure that he still gets delicious home-cooked dinners as many nights as possible. One way I am able to accomplish this is by making one of his favorite dishes last.

The last few weeks he's been requesting Chicken Parmesan. I have to admit, this isn't one of my favorite dishes and after each request for it, I'd try to find something else that he would be just as happy with. But when I wasn't going to be home really at all to make dinner a couple weeks ago, I gave in and made him chicken pram. Clearly chicken pram can be incredibly easy- a jar of good tomato sauce, some chicken cutlets, and some bread crumbs. But that is just not how I roll so I turned to one of my bff's, Miss Martha Stewart, and made it a little more special with her recipe for easy homemade chunky tomato sauce.

Easy Chunky Tomato Sauce

3 tbsp olive oil
1 large onion, chopped
3 cloves garlic, chopped
salt and pepper
2 28 oz cans diced tomatoes
1/2 tsp dried thyme or Italian seasoning

Heat oil in a saucepan over medium high heat. Add onion, garlic, salt, and pepper, and cook until softened, about 5 minutes. Add tomatoes with their juice and thyme. Simmer, stirring occasionally, until sauce has thickened, 20-25 minutes.

Chicken Parmesan

3/4 cup plain breadcrumbs
3/4 cup grated Parmesan cheese
8 chicken cutlets
salt and pepper
1 large egg, lightly beaten
2 cups Chunky Tomato Sauce, recipe to follow
1/4 cup olive oil
6 ounces mozzarella cheese, cut into eight 1/4-inch-thick slices

Heat broiler. Combine breadcrumbs and Parmesan in a shallow bowl. Season both sides of chicken with salt and pepper. Dip chicken in beaten egg then dredge through breadcrumb mixture, turning to coat both sides.

Heat oil in a large skillet. Cook chicken in skillet until golden brown on both sides. Spread tomato sauce on bottom of a baking dish and place browned chicken cutlets on sauce. Top each cutlet with slice of mozzarella cheese. Broil about 4 inches from heat source until cheese is melted and lightly browned in spots, about 5 minutes. Serve immediately over pasta.

Recipes adapted from Martha Stewart.com

Thursday, March 10, 2011

Inspired by Jersey, Created By San Fran: Pork Sugo


A few weeks ago, one of the very lovely ladies that I work with told me about this dish that her boyfriend was working on. And by working on, she meant that he had started the dish one morning and it wouldn't be complete and ready for them to eat until the following night. I have to say, this really sparked my interest. I'd never heard of pork sugo before but clearly, I love pork and I really love a dish that slow cooks for a long time and takes lots of love and heart to prepare. I know it's totally cheesy, but I have to agree when chefs, and eaters, talk about how much better food tastes when it's made with love. Luckily enough, a few days later this recipe arrived in my inbox from my co-worker's very sweet boyfriend. I decided to try out the recipe this past weekend.

He suggested that I serve the pork sugo over polenta or grits. To be honest, I'm not very familiar with making either so I did a little googling to find other suggestions and I stumbled upon something even more amazing than I'd already thought I'd found. One of the most fabulous restaurants in San Fran, Delfina, where I spent a few lovely, much too short lunches with 2 of my SF bff's serves this dish and actually let San Francisco's 7x7 Magazine publish the recipe. I thought I'd died and went to recipe heaven! I mean... pork, San Francisco's Delfina, I learned of it in Jersey! How much more perfect could it be!! This recipe was a huge treat for me to find, to cook, and to enjoy. It was one of those dishes where I felt so good making it and my love and excitement for the dish shined through in every bite.

It took me two days to complete the dish but it was well worth it. This is actually something that would be really great to start on a Sunday evening, before your work week starts, as most of the work is done on Sunday. Then on Monday after a long day at work, you just have a few quick and easy steps left and dinner is ready. It makes for great leftovers too!

Pork Sugo

1lb pork butt
1/2 rack pork spareribs
salt & pepper
1/4 cup canola oil
1 1/2 cup sliced yellow onion
1/2 cup carrots, sliced on the diagonal
1/2 cup celery, sliced on the diagonal
2 cloves garlic, smashed
1 sprig rosemary
3 sage leaves
1 tbsp tomato paste
1/2 cup dry white wine
1 quart chicken stock
1 1/2 tbsp butter
1 tsp chopped fresh parsley
pinch chili flakes, optional
grated parmesan, to taste
1lb pappardelle or other fresh pasta

Cut the pork butt into 2 large pieces. Season the pork butt and the spareribs with salt and pepper. Heat the oil in a large dutch oven or other heavy bottomed pot. Brown pork on all sides. Remove and set aside.

To the pot add onions, carrots, celery, garlic, and herbs and saute for a couple minutes until the vegetables start to get tender, stirring occasionally to scrape up brown pork bits from bottom of pan. Add tomato paste and cook, stirring occasionally for 2 minutes. Add wine to deglaze pot and cook until reduced by half, about 5-6 minutes.

Return pork to the pot and add chicken stock. Bring to a simmer. Cover and transfer to 325 degree preheated oven. Braise in oven until pork is tender and falling off the bone, about 2 hours. Remove from oven, let cool, and refrigerate overnight.

The next day scrape any congealed fat from the top and discard. Over low heat, warm sugo through. Remove pork and ribs from pot. Pull meat from bones and shred the rib meat and the pork butt (the pork should shred rather easily using 2 forks).

Pour veggies and liquid from the pot into a food processor and puree until smooth. Return to pot and reduce sauce over medium heat until it thickens. Adjust seasoning with salt and pepper to taste. Add meat to pot, bring to a boil and turn off heat.

Meanwhile, cook pasta according to package directions. To serve, warm some pork sugo in a pan with butter, parsley, and chili flakes. Serve over pasta and top with grated parmesan.

Recipe adapted from Delfina as featured in SF's 7x7 Magazine

Friday, March 4, 2011

Dinner For Two: Seafood Paella


This Valentine's day I wanted to make something a little different. The weather in central Jersey is starting to get a bit more springy but it is still chilly and there is a little snow left on the ground, therefore I was in search of something that felt a bit lighter but was also warm and cozy. When perusing my cookbooks, this dish jumped out at me as the perfect dish for a romantic dinner for two on a not quite spring evening. After making Cioppino I've really been into dishes with lots of different types of seafood. It also reminded me how much I love mussels and now that I know I can cook them at home I figured I'd give this Spanish classic a try. I have to say it also looks really beautiful when it's all composed. So many gorgeous colors and yummy seafood bits.

Seafood & Sausage Paella

2 tbsp olive oil
2 thick cut slices of bacon, diced
1 large onion, chopped
4 cloves garlic, minced
1 green pepper, seeded and chopped
1 cups rice (Arborio rice is great)
1 tsp dried oregano
1 tsp ground coriander seeds
2 cups bottled clam juice
2 Spanish chorizo sausages, sliced 1/4 inch thick
2 canned whole tomatoes, chopped
1 tsp saffron threads
1/2 lb shrimp
1/4 to 1/2 lb squid
1/2 lb monkfish, cod, or seabass
1 lb mussels
about a 1/2 cup dry white wine
1 cup frozen peas, thawed
salt and pepper

In a heavy flameproof casserole dish or dutch oven over medium high heat, heat the oil. Add bacon and cook until crisp, about 2 minutes. Reduce heat to medium, add onion and cook until soft, about 4 minutes. Add garlic and bell pepper and cook until soft, about 5 minutes more. Stir in rice, oregano, and coriander and cook, stirring until rice is opaque, about 2 minutes. Heat stock and addict with chorizo, tomatoes, and saffron. Mix well, cover and cook over low heat until most of the liquid is absorbed and the rice is almost tender, about 25 minutes. Stir occasionally as the rice cooks and add a splash of water if it becomes dry.

As rice is cooking, prepare seafood and set aside. Shell and devil shrimp. Cut squid into 1/4 inch rings. Cut fish fillets into 1 inch cubes.

Put mussels and wine in a covered pot, discarding any that do not close to the touch. Steam mussels until shells open, about 5 minutes. Discard any that don't open. Remove from heat and set aside. Strain broth from mussels through a fine sieve lined with cheesecloth (a coffee filter works great!).

Add shrimp, squid, fish, peas, and mussel broth to the paella and cook for 5 minutes until fish is cooked through. Season to taste with salt and pepper. Serve paella and top with mussels.

Recipe adapted from The Williams-Sonoma Cookbook: The Essential Recipe Collection for Today's Home Cook

Wednesday, February 23, 2011

Farmhouse Love

GESE! I've been such a blog slacker lately! I'm kind of in a funk tonight and I'm hoping that a little blogging will help get my creative juices flowing again as well as turn my frown upside down. I'll be honest, my transition to Jersey life hasn't exactly been the easiest. I miss my career, I miss my friends, I miss the food, I miss the weather... I miss a whole lot from my life on the west coast. But, I don't think a huge move like this would be easy on anyone so I'm trying my best to focus on the good things. One of the good things being my adorable farm house and making it a beautiful home with my husband and my hounds. We finally found a home furnishings wonderland last weekend at ABC Carpet and Home in NYC. We are headed back this weekend to purchase a sofa and hopefully lots of other fun goodies to deck out our living room so be on the lookout of some pics of my newly furnished living room in the near future!

In the meantime, we got the most perfect chandelier for our dining room from Pottery Barn. It makes me want to dine in our dining room for any and all dining occasions. It is so cute and just right for the farmhouse. It's 16 mason jars and I absolutely LOVE it!


Coming up... a delish Paella recipe recently enjoyed under this very chandelier on a day filled with love.

Thursday, January 27, 2011

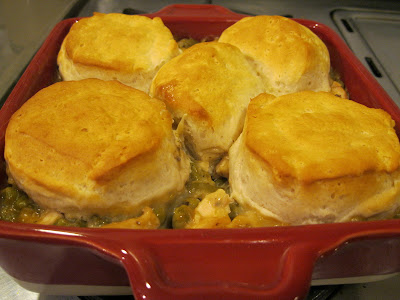
Super Simple Weeknight Meals: Country Chicken and Biscuits


Life seems to be flying by lately and my days seem to do the same. I have very few nights these days where I have time to make a nice dinner for the hubs and I, which means I'm in search of more and more quick and easy weeknight supper recipes. My dad gave me a cookbook a while ago and while thumbing through it one night, I found this recipe. I've made it many, many times as the hubs absolutely loves it. I love it because it's cheap and if using already cooked chicken, such as a rotisserie chicken from your local market, the prep work takes about 10 minutes and you can let your oven do the rest. Oh, and feel free to add any mixture of your favorite veggies to change up the dish as you'd like. 

Now as much as I'd love to live an organic lifestyle, sometimes life just doesn't permit it and this recipe is the perfect solution to those days. With that said, I plan to create my own version of this dish this summer when fresh veggies are in full swing and my days are a little longer. If it works out, you can expect a delish organic, Jersey Fresh Sunday supper to come your way in a few months. 

Country Chicken and Biscuits

1 14.5 oz can cream of soup, any variation you like such as cream of mushroom
1/3 cup milk
1 14.5 oz can green beans
1 cup frozen or canned peas
2 cups chicken, cooked and cut into bite size pieces
salt and pepper, to taste
1 11 oz can refrigerated biscuits

Preheat oven to 375 degrees. Combine soup and milk in a large bowl. Add chicken, green beans, peas and salt and pepper. Spoon into an 11x7 inch baking dish. Cover with foil and bake 20 to 25 minutes. 

Remove from oven. Separate biscuits and place on top of heated chicken mixture. Bake 15 to 20 minutes or until biscuits are baked through and golden brown. Serve hot.

Recipe adapted from "Old Fashioned Favorite Recipes of All Time" by Barnes and Noble

Sunday, January 23, 2011

Sunday Supper: Crab Cake Macaroni and Cheese


One of my favorite childhood memories stems from all the time I was lucky enough to spend as a kid with one of the most amazing women I know, my grandma Watson. She was a nurse in World War 2, raised my mom all on her own, and was absolutely the most fun person to hang out with when I was a kid, along with her sister, my aunt Hazel. When my brother and I visited her house for sleepovers it was all about what we wanted to do. I would make magazines with aunt Hazel, we'd play cards and lots of games including Tripoli and Sorry, and on New Year's Eve every year we would dance and party until the ball dropped. She truly made me feel like there was nothing else in the world she would rather be doing than hang out with my brother and I.

Along with all the great times we spent with her, I have great memories of food. We used to make delicious sugar cookies with frosting in fun shapes. I still remember exactly what all her cookie cutters looked like. She made the most amazing bread and butter pickles which I only hope to get the recipe for one of these days. And finally, something my brother would eat every day if he could, her macaroni and cheese. It wasn't anything special and was made with good old Velveeta cheese but it was so creamy and delicious and perfect every time she made it. This mac and cheese was such a huge part of my childhood that any time I see mac and cheese anywhere, it always takes me back to all of the great times I spent with my Grandma Watson. I think of her often and miss her a ton, but I'm so glad that I have so many memories that I will be able to share with my family one day through her recipes.

I saw this recipe on a Rachel Ray show recently. I don't really care for Rachel Ray and was telling the hubs that we should change the channel but then she said she'd be making crab cake mac and cheese. Between my love/warm fuzzies for mac and cheese and my love for crab cakes, I couldn't bare to change the channel. It looked so good that I had to give it a shot! I thought it'd be a perfect twist on my grandma's classic and perfect for Sunday Supper! The dish isn't terribly cheesy, which is a good thing because you really want the crab to be the star player. The panko gives it a little crunch and the hot sauce adds the perfect touch of heat. It turned out SO delish and definitely something that I'll make again. The only downfall is that it dirties quite a few dishes but it's so good and your hunny will be so satisf that I bet you could easily talk him into doing all the clean up!

Crab Cake Mac and Cheese

1lb elbow pasta
2 tbsp olive oil
6 tbsp butter
3 ribs celery, chopped
1 medium onion, chopped
1/2 red bell pepper, seeded and chopped
3-4 cloves garlic, chopped
1 bay leaf
1 tbsp thyme (2 tbsp if fresh)
about 1 tbsp lemon zest
freshly ground black pepper
3/4 to 1lb jumbo fresh crab meat (picked through for shells)
1 tbsp old bay
3 tbsp flour
2 1/2 cups milk
1 tbsp dijon mustard
1 cup sharp cheddar, grated
1 cup gruyere, grated
3 tbsp (or to taste) hot sauce
1 cup panko bread crumbs
fresh parsley, chopped
1/2 cup grated parmesan cheese

Cook pasta according to package directions, about 2-3 minutes less so pasta is undercooked (it will cook more in the oven) and drain. Add to a large bowl.

In a saucepan heat 2 tbsp of olive oil and 1 tbsp of butter over medium high heat. Add celery, onion, red pepper, garlic, bay leaf, thyme, lemon zest, salt, and pepper to taste. Cook until tender, 6-8 minutes. Add crab meat and season liberally with old bay. Stir to combine and remove from heat.

In a saucepan over low heat, melt 3 tbsp butter and whisk in flour. Cook for 1 minute then whisk in milk until just starting to boil. Season with salt and pepper and cook for a couple of minutes, stirring so as not to burn, until cream sauce starts to thicken. Add mustard and cheese. Stir until cheese is melted. Add cream sauce and vegetable mixture to bowl with pasta and stir to blend together.

Spoon mixture into a large casserole dish or into small individual baking crocks. Preheat oven to 375 degrees.

Melt 2 tbsp butter in a saucepan. Add hot sauce and bread crumbs and toss to coat. Remove from heat and cool enough to handle then add parmesan. Top pasta mixture with bread crumb mixture and bake until heated through and bread crumbs are golden brown, about 10 minutes.

Recipe adapted from Rachel Ray on The Cooking Channel