Showing posts with label comfort food. Show all posts

Monday, August 1, 2011

From Canada With Love: Poutine


One of the best things about where I grew up was that we were just steps away from the Canadian border. We had lots of fun times with our neighbors to the north... some our parents knew about... some they did not. I mean, the drinking age was 18! One of the BEST things to ever derive from Canada is poutine. Now, a classic poutine is found at a diner type place and consists of french fries, cheese curds, and gravy. Over the last few years poutine has begun to pop up at finer establishments in fancier forms with ingredients such as short ribs or even with fois gras. I'm not opposed to these new, classier dishes but I do feel that maybe they could be given a new name. Poutine is supposed to be served in a dive on a huge plate with lots of grease... it's just the way it is. 

Last weekend I was craving poutine and since it would take me over 6 hours to get the classic ingredients I realized I was going to have to make due. The fries I could easily do but I was going to have to be a little more creative with the cheese and the gravy. As long as the gravy is good and rich, it'll work so I found a recipe that included shallots, beef stock, and red wine. It sounded rich enough so I gave it a shot. The cheese was a challenge though. Poutine is traditionally made with cheese curds which are no where to be found in my hood therefore I went with original flavored baby bell cheeses. It was the closest I could think of to the texture and flavor I needed and I have to say it was a good choice. It melted a bit to quickly but the flavor was perfect! All in all I made a really great dish that I'm not sure I can confidently call poutine but I will happily call it French Fries with Gravy and Cheese.

French Fries with Gravy and Cheese 

4 russet potatoes, scrubbed and cut into about 1/2 inch thick fries
Vegetable oil, enough to fill a large pan about 1/3 full for frying
salt
3 tablespoons minced shallot
2 (3-inch) sprigs fresh thyme
1 tablespoon unsalted butter
1/2 cup dry red wine
1 tablespoon water
3/4 teaspoon cornstarch
1 cup beef or veal demi-glace
1 teaspoon coarsely cracked black pepper
1/2 teaspoon salt
1/2 tablespoon unsalted butter
6-8 babybell original flavored cheese, unwrapped and cut into about 4 squares per cheese round.


Clean potatoes and cut into about 1 inch thick fries. Place in a large bowl of cold water and let soak about 10 minutes. Rinse potatoes until water runs clear and place on paper towels to dry. Dry off potatoes as much as possible before frying. 


In a heavy bottom large pot heat vegetable oil to about 375 degrees. Once oil is hot fry potatoes in as many batches as needed so as to not overcrowd. Drain on a paper towel.

Cook shallot and thyme in butter in a heavy saucepan over medium heat stirring frequently until shallot is softened and golden, about 2 minutes. Add wine and bring to a boil until reduced by half, about 3 minutes. Discard thyme sprigs. While wine thickens, stir together water and cornstarch in a small bowl until cornstarch dissolves. Stir 1 cup beef stock into wine and bring to a boil. Whisk in cornstarch mixture and return to a boil, then boil until sauce is slightly thickened, about 3 minutes. Remove from heat and stir in pepper, salt, and butter until butter is melted.

Place fries on a large plate and top with cheese and gravy. Heat in preheated oven for about 5 minutes at 400 degrees just until cheese starts to melt. Do not completely melt cheese. It should still have it's shape, it should just be soft. Serve hot.

Gravy recipe adapted from epicurious.com

Thursday, January 27, 2011

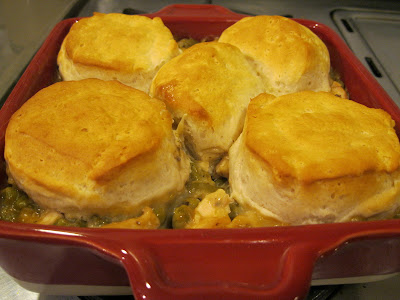
Super Simple Weeknight Meals: Country Chicken and Biscuits


Life seems to be flying by lately and my days seem to do the same. I have very few nights these days where I have time to make a nice dinner for the hubs and I, which means I'm in search of more and more quick and easy weeknight supper recipes. My dad gave me a cookbook a while ago and while thumbing through it one night, I found this recipe. I've made it many, many times as the hubs absolutely loves it. I love it because it's cheap and if using already cooked chicken, such as a rotisserie chicken from your local market, the prep work takes about 10 minutes and you can let your oven do the rest. Oh, and feel free to add any mixture of your favorite veggies to change up the dish as you'd like. 

Now as much as I'd love to live an organic lifestyle, sometimes life just doesn't permit it and this recipe is the perfect solution to those days. With that said, I plan to create my own version of this dish this summer when fresh veggies are in full swing and my days are a little longer. If it works out, you can expect a delish organic, Jersey Fresh Sunday supper to come your way in a few months. 

Country Chicken and Biscuits

1 14.5 oz can cream of soup, any variation you like such as cream of mushroom
1/3 cup milk
1 14.5 oz can green beans
1 cup frozen or canned peas
2 cups chicken, cooked and cut into bite size pieces
salt and pepper, to taste
1 11 oz can refrigerated biscuits

Preheat oven to 375 degrees. Combine soup and milk in a large bowl. Add chicken, green beans, peas and salt and pepper. Spoon into an 11x7 inch baking dish. Cover with foil and bake 20 to 25 minutes. 

Remove from oven. Separate biscuits and place on top of heated chicken mixture. Bake 15 to 20 minutes or until biscuits are baked through and golden brown. Serve hot.

Recipe adapted from "Old Fashioned Favorite Recipes of All Time" by Barnes and Noble

Sunday, January 9, 2011

Sunday Supper: Winter Warm Up Chili


We are in the midst of a winter wonderland and I absolutely love it! My yard is completely snow covered; the geese continue to wade in the brook; and Puppy (our youngest hound) gets up every morning, goes straight to her window seat and looks out the window patiently waiting until we let her out to frolic in the snow. The hubs and I finally got a rug for our living room this morning and then we spent the rest of the day playing in the snow with the hounds. There is something about running around in the snow while playing with my dogs that makes me giggle and completely forget about any other craziness going on in my life.

After a fun filled day of playing in the snow I decided to make a big pot of chili to warm up the hubs and I. I've made chili lots of times but have yet to find THE recipe. This time around, I thought I'd try winging it and it was by far the best chili I've ever made! It was a little smoky, a little spicy, a little sweet, and the perfect thing to warm us up after a day in the snow.

Winter Warm Up Chili

4 slices thick cut bacon, chopped
1 tbsp olive oil
2 medium onions (1 sweet, 1 yellow), chopped
5 cloves garlic, minced
1 4 oz jar diced green chiles
3/4 lb ground beef
3/4 lb ground pork
3/4 lb ground veal
1 tbsp chipotle chili powder
1 tbsp paprika
1 tsp cumin
1 tsp oregano
1 tbsp salt
1/2 tbsp fresh ground black pepper
1 1/2 tbsp brown sugar
2 14.5 oz cans fire roasted tomatoes with garlic
2 tbsp tomato paste
1 15 oz can chili beans
1 tbsp of your favorite bbq rub (I used the hubs secret blend that we like to call Nuts & Bolts)

Garnish:
sharp cheddar cheese

Heat oil in a large pot or dutch oven over medium high heat. Cook bacon until just starting to crisp. Remove from pot and drain on paper towel. Add onion and cook until softened and golden, about 6 minutes. Add garlic and green chiles. Cook for 1 minute. Add beef, pork, and veal and cook until brown, about 5 minutes. Add chili powder, paprika, cumin, oregano, salt, pepper, and brown sugar and stir until well blended. Stir in tomatoes with their juice, tomato paste, chili beans, and add cooked bacon back to pot. Bring to a boil then reduce heat to low and simmer, uncovered, about 1 hour until liquid reduces a bit and chili is thick and chunky. Add bbq rub and continue simmering, covered, at least 1 more hour. Serve hot with crusty bread and top with shredded sharp cheddar cheese.

Modern Housewife Tips:
1. The blend of meat adds a lot more flavor. I found the blend that I used all packaged together at my local grocery store which is why I used what I did but most importantly, you want to use beef and pork at the very least.
2. The longer you simmer, the better! I initially was only going to simmer 1 hour but after an hour, we decided to let it go longer to let the flavor really penetrate the meat. You want to try to simmer at least 2 hours.
3. Next time I will try rubbing the meat with the bbq rub and letting it marinate for about an hour before cooking to give it even more flavor.

Sunday, December 5, 2010

Sunday Supper: Turkey Meatloaf with Mushroom and Herbs


It's getting cold here in central New Jersey and I'm craving warm comfort food. My mom introduced me to turkey meatloaf a year or two ago when she came out to San Francisco on one of her many visits. She made a delicious BBQ turkey meatloaf which one day, I shall share with you. From then on, I've tended to gravitate towards recipes using ground turkey rather than the classic ground beef, which is against the wishes of the hubs. He loves the classic version- straight off the french onion soup box. But then again, who doesn't!?

I found this recipe from epicurious.com and since we love mushrooms in this house I thought I'd give it a shot. I think it'd make a perfect Sunday supper on a cold day. What sounds better than a warm fire, some comfy clothes, slippers, and a steaming plate of comfort food after spending the day tree trimming and decorating for the holidays? I sure as heck can't think of anything!

Turkey Meatloaf with Mushrooms and Herbs

2 tbsp olive oil
2 cups day old crustless bread, cut into 1/3 inch cubes
1 cup chicken broth
8 ounces sliced mushrooms (crimini or white button are great)
2 large eggs, lightly beaten
1/4 cup minced shallots
2 tbsp chopped fresh Italian parsley (or 1 tbsp dry)
1 tbsp chopped fresh thyme (or 1/2 tbsp dry)
2 tsp salt
1/2 tsp black pepper
1lb ground turkey (about 15% fat)
1lb ground turkey breast

Preheat oven to 350 degrees. Brush a loaf pan with olive oil.

Toss bread with broth in a large bowl. Let stand about 10 minutes, until bread absorbs liquid and softens. Mix in mushrooms, eggs, shallots, parsley, thyme, salt, and pepper. Add turkey, mix just until blended. Transfer to loaf pan.

Bake about 1 hour 25 minutes, until thermometer inserted into center reads 170 degrees. Let rest 15 minutes before serving.

recipe adapted from epicurious

Friday, May 7, 2010

Fit for a Farmhouse: Chicken and Dumplings


Well hello all you pretty little modern housewives. How I've missed you so!! I am dearly sorry for my absence this past week. The hubs and I headed back to the east coast for his sister's wedding on Saturday and then we roamed New Jersey and a tiny piece of New York in search of the perfect town and perfect house to start our next adventure on the east coast. We certainly had no intention of finding said perfect house but were more focused on finding the perfect town. Amazingly so, we found both!

When asked what I would love in a home, my short version is "an old farmhouse that is fully modernized on the inside". Well, I have to say I found just that. We found an 1830's dutch colonial on 2 acres of gorgeous land along a pretty little brook. The house has that old world charm but was remodeled in 2000 and is absolutely to die for on the inside. Obvi, the kitchen is of huge importance and I DIED for this kitchen, especially the 1952 Wedgewood stove. And now all I can think about (other than crossing every part of myself that will cross so that we get this house) is the perfect meal to cook in my old farmhouse kitchen. One of the most delicious things to come to mind so far is a classic comfort food dish that we all know and love: Chicken and Dumplings.

I found this Chicken and Dumplings recipe in Cooking Light a few years back and not only is it delish, but being that it is from Cooking Light it's a bit healthier than the Chicken and Dumplings that may have been made in my farmhouse's kitchen back around the Great Depression, which is when this dish originated. So light a fire, turn off the TV, and set the dining room table because this is one classic dish to be enjoyed by you and your loved ones while appreciating a little old world charm.


Herbed Chicken and Dumplings

Cooking Spray
8oz skinless boneless chicken breasts or thighs cut into bite-sized pieces
3/4 cup chopped celery (about 1/4 inch pieces)
1/2 cup chopped carrot (about 1/4 inch pieces)
1/2 cup chopped onion
1/8 tsp dried thyme
3 parsley sprigs
1 bay leaf
3 cups fat free, less sodium chicken broth
about 1/2 cup all purpose flour
1 tbsp chopped fresh parsley
1/4 tsp baking powder
1/4 tsp salt
1/4 cup 1% low-fat milk

Heat a large saucepan over medium high heat. Coat pan with cooking spray. Add chicken to pan and cook 4 minutes, browning all sides. Remove chicken from pan and keep warm. Add celery and next 5 ingredients (through bay leaf) to pan. Saute 5 minutes or until onion is tender. Return chicken to pan, cook 1 minute. Add broth to pan and bring to a boil. Cover, reduce heat and simmer for 30 minutes.

Lightly spoon flour into a measuring cup and level with a knife. Combine flour, chopped parsley, baking powder and salt in a medium bowl. Add milk. Stir just until moist. Spoon by heaping teaspoonfuls into broth mixture. Cover and simmer 10 minutes or until dumplings are done. Discard parsley sprigs and bay leaf. Serves 2 (serving size: 2 cups).

recipe and image courtesy of Cooking Light

Thursday, April 22, 2010

Back to Basics: Roast Chicken


I recently was watching an episode of No Reservations with the amazing Anthony Bourdain (I just love him). Instead of travelling in this episode, he focused solely on technique and the basics of cooking. His friend and incredible chef, Thomas Keller (owner of French Laundry which I hope to one day have the privilege and funds to dine at) did a little tutorial on the perfect Roast Chicken. It was an incredibly simple recipe and it made me think how important it is for a modern housewife like myself to be able to make the perfect roast chicken. Now, I have to admit, I've had some practice and am not quite there yet but I'm confident my next bird will be perfection. I've got the flavor and roasting part down. My only problem is I often roast the bird upside down. I can't even believe I'm announcing that to all of you, but its true. For some reason I just have a hard time telling when the little lady is on her stomach or on her back. But I think I've figured it out now. So... I feel its safe to share with you my secrets for roasting the perfect chicken.

Roast Chicken with Vegetables and Herb Butter

3 1/2 to 4 lbs whole chicken
salt and pepper
herb butter (recipe below)
1 lemon, quartered
1 yellow onion, quartered
3 garlic cloves, peeled
2 parsnips, cut into large chunks
2 pounds potatoes (fingerling or new red potatoes are both great options), cut into large chunks
2 turnip, cut into large chunks
2 carrots, cut into large chunks

Allow chicken to stand at room temperature for 20-30 minutes. Preheat oven to 425 degrees.

In bottom of roasting pan toss vegetables, including 1/2 of onion, with Olive Oil, salt and herbs (fresh sprigs of thyme are a great option).

Pat chicken dry with paper towels. Season chicken with salt and pepper, including inside of cavity. Fill cavity with lemon, garlic cloves and other half of onion. Rub exterior of chicken allover with some of herb butter, including under skin. Place chicken on top of vegetables. Drop 1-2 tbsp of herb butter over vegetables. Roast in oven for about an hour, occasionally basting with pan juices, until an instant read thermometer registers 165 degrees. Let rest 10 minutes before carving.

Herb butter

1 cup loosely packed fresh herbs, such as parley, oregano, thyme, or marjoram
1 cup butter, room temperature

Combine herbs and butter in a bowl or food processor, pulsing until combined.

Some tips:
1. Any unused herb butter can be stored in an airtight container for up to 2 weeks. It's also great on a sizzling hot steak right off the grill.
2. Vegetables are also delicious when roasted separately and get a little crisper.
3. A great way for the hubby to feel involved and like the "man of the house" (even though we all know who is really in charge) is to have him do the carving.

Herb butter recipe courtesy of Martha Stewart
Roast chicken courtesy of moi, with influences by Martha and Joy of Cooking (a cookbook every modern housewife needs to add to their collection)

Sunday, April 18, 2010

Ain't No Marie Callender's Chicken Pot Pie


Who doesn't love to come home to the aroma of classic, cozy comfort food permeating from their oven. I know I do, although, usually the hubs is the one coming home to it while I'm the one preparing. Either way, all those classic comfort food dishes just tickle me pork! I came across this deliciously modern Chicken Pot Pie recipe in Cooking Light magazine a few years back. Being that it came from Cooking Light, it is obviously much lighter in fat than a classic Chicken Pot Pie but my fave thing about this dish (besides that its super tasty and makes great leftovers) is how easy it is. The phyllo dough topping makes this dish unbelievably simple and is a HUGE time saver. I think this dish is an absolute must for all you modern housewives to add to your repertoire.

2 tbsp butter
2 tbsp olive oil
3 cups red potato (about 1 pound)
2 cups diced onion
2 cups sliced mushrooms (about 8oz.)
1 cup diced celery
1 cup diced carrot
1/4 cup chopped fresh parsley
2 tsp chopped fresh thyme
2 1/2 tbsp all-purpose flour
3 cups fat free milk
1/2 cup less sodium chicken broth
2 cups chopped cooked chicken breast (about 12oz.)
1 cup frozen green peas
1 tsp salt
1/2 tsp freshly ground pepper
6 sheets phyllo dough, thawed

Preheat oven to 375.
Melt butter in a large saucepan over med-high heat; add oil. Add potatoes and next 6 ingredients (through thyme). Saute for 5 minutes. Reduce heat to low and sprinkle flour over vegetables. Cook for 5 minutes, stirring frequently. Stir in milk and broth. Increase heat to med-high and bring to a boil. Reduce heat and simmer until thickened, about 5 minutes. Add chicken, peas, salt and pepper.
Spoon mixture into a 2-quart baking dish. Place 1 phyllo sheet on a large cutting board or work surface. Make sure to cover remaining phyllo dough with a towel to keep from drying out. Lightly spray phyllo sheet with cooking spray. Repeat layers with cooking spray and place phyllo layers loosely on top of mixture in dish. Place dish on baking sheet and bake at 375 for 20 minutes. Makes about 6 servings.

A few tips:
1. To save even more time, grab an already cooked rotisserie chicken from your grocery store.
2. Phyllo dough can be found in the freezer section at your grocery store. You will get more sheets than you need in a pkg so feel free to throw those unused sheets back in your freezer for next time.
3. Fresh herbs are always nice, but I've found I can never use up all the herbs that come in a pkg, thus it ends up going to waste, which I hate! Dried herbs are just as yummy in this dish, just make sure to cut the amount in half as dried herbs are about twice as strong as fresh herbs.

recipe courtesy of Cooking Light April 2007